
React is an awesome JavaScript library for building user interfaces. Since the publishing of Create React App, it has become very easy to scaffold a barebones React application.
In this article, we will be using Firebase along with Create React App to build an app which will function similar to Reddit. It will allow the user to submit a new link which can then be voted on.
Here’s a live demo of what we’ll be building.
Why Firebase?
Using Firebase will make it very easy for us to show real-time data to the user. Once a user votes on a link, the feedback will be instantaneous. Firebase’s Realtime Database will help us in developing this feature. Also, it will help us to understand how to bootstrap a React application with Firebase.
Why React?
React is particularly known for creating user interfaces using a component architecture. Each component can contain internal state or be passed data as props. State and props are the two most important concepts in React. These two things help us determine the state of our application at any point in time. If you are not familiar with these terms, please head over to the React docs first.
Note: You can also use a state container like Redux or MobX, but for the sake of simplicity, we won’t be using one for this tutorial.
The whole project is available on Github.
By the way, for a high-quality, in-depth introduction to React, you can’t go past Canadian full-stack developer Wes Bos. Try his course, and use the coupon code ‘SITEPOINT’ to get 25% off and to help support SitePoint.
Setting up the project
Let’s walk through the steps to set up our project structure and any necessary dependencies.
Installing create-react-app
If you haven’t already, you need to install create-react-app. To do so, you can type the following in your terminal:
npm install -g create-react-app
Once you’ve installed it globally, you can use it to scaffold a React project inside any folder.
Now, let’s create a new app and call it reddit-clone.
create-react-app reddit-clone
This will scaffold a new create-react-app project inside the reddit-clone folder. Once the bootstrapping is done, we can go inside reddit-clone directory and fire up the development server:
npm start
At this point, you can go to http://localhost:3000/ and see your app skeleton up and running.
Structuring the app
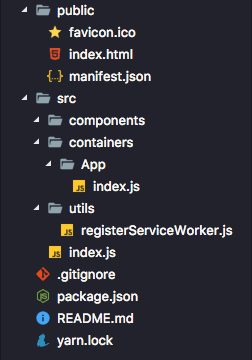
For maintenance, I always like to separate my containers and components. Containers are the smart components which are contains the business logic of our application and manage Ajax requests. Components are simply dumb presentational components. They can have their own internal state which can be used to control the logic of that component (e.g. showing the current state of a controlled input component).
After removing the unnecessary logo and css files, this is how your app should look like now. We created a components folder and a containers folder. Let’s move App.js inside the containers/App folder and create registerServiceWorker.js inside the utils folder.
Your src/containers/App/index.js file should look like this:
// src/containers/App/index.js

import React, { Component } from 'react';

class App extends Component {
  render() {
    return <div className="App">Hello World</div>;
  }
}

export default App;
Your src/index.js file should look like this:
// src/index.js

import React from 'react';
import ReactDOM from 'react-dom';
import App from './containers/App';
import registerServiceWorker from './utils/registerServiceWorker';

ReactDOM.render(<App />, document.getElementById('root'));
registerServiceWorker();
Go to your browser and if every thing works fine you will see Hello World on your screen.
You can check my commit on Github.
Adding react-router
React-router will help us define the routes for our app. It’s very customizable and very popular in the react ecosystem.
We will be using version 3.0.0 of react-router.
npm install --save react-router@3.0.0
Now, add a new file routes.js inside the src folder with the following code:
// routes.js

import React from 'react';
import { Router, Route } from 'react-router';

import App from './containers/App';

const Routes = (props) => (
  <Router {...props}>
    <Route path="/" component={App}></Route>
  </Router>
);

export default Routes;
The Router component wraps all the Route components. Based on the path prop of the Route component, the component passed to the component prop, will be rendered on the page. Here, we are setting up the root URL (/) to load our App component using the Router component.
<Router {...props}>
  <Route path="/" component={ <div>Hello World!</div> }>
  </Route>
</Router>
The above code is also valid. For the path /, the <div>Hello World!</div> will be mounted.
Now, we need to call our routes.js file from our src/index.js file. The file should have the following content:
// src/index.js

import React from 'react';
import ReactDOM from 'react-dom';
import { browserHistory } from 'react-router';

import App from './containers/App';
import Routes from './routes';
import registerServiceWorker from './utils/registerServiceWorker';

ReactDOM.render(
  <Routes history={browserHistory} />,
  document.getElementById('root')
);

registerServiceWorker();
Basically, we are mounting our Router component from our routes.js file. We pass in the history prop to it so that the routes know how to handle history tracking.
You can check my commit on Github.
Adding Firebase
If you don’t have a Firebase account, create one now (it’s free!) by going to their website. After you’re done creating a new account, log into your account and go to the console page and click on Add project.
Enter the name of your project (I’ll call mine reddit-clone), choose your country, and click on the Create project button.
Now, before we proceed we need to change the rules for the database since, by default, Firebase expects the user to be authenticated to be able to read and write data. If you select your project and click on the Database tab on the left, you will be able to see your database. You need to click on the Rules tab on the top that will redirect us to a screen which will have the following data:
{
  "rules": {
    ".read": "auth != null",
    ".write": "auth != null"
  }
}
We need to change this to the following:
{
  "rules": {
    ".read": "auth === null",
    ".write": "auth === null"
  }
}
This will let users update the database without logging in. If we implemented a flow in which we had authentication before making updates to the database, then we would need the default rules provided by Firebase. To keep this application simple, we won’t be doing authentication.
Important: If you don’t make this modification, Firebase won’t let you update the database from your app.
Now, let’s add the firebase npm module to our app by running the following code:
npm install --save firebase
Next, import that module in your App/index.js file as:
// App/index.js
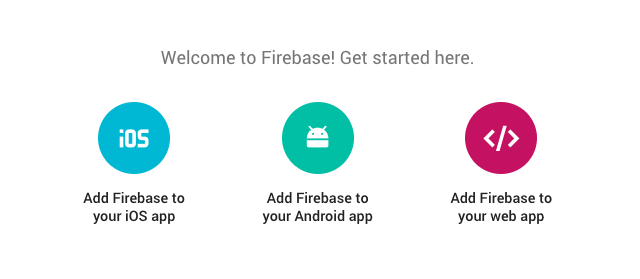
import * as firebase from 'firebase';When we select our project after logging into Firebase, we will get an option Add Firebase to your web app.
If we click on that option, a modal will appear which will show us the config variable which we will use in our componentWillMount method.
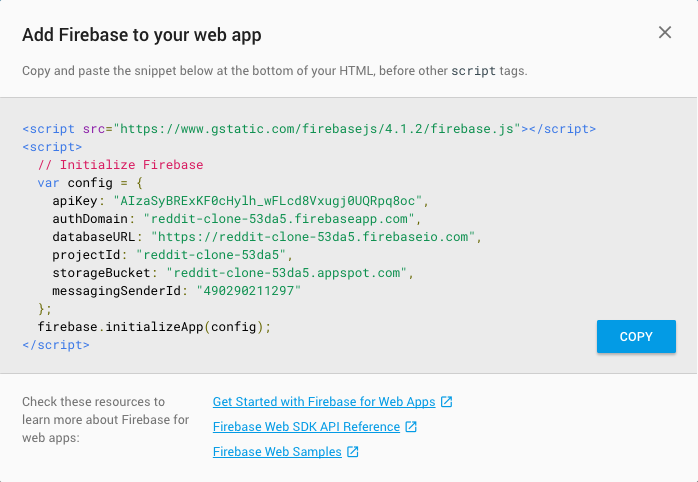
Let’s create the Firebase config file. We shall call this file firebase-config.js and this file will contain all the configs necessary to connect our app with Firebase.
// App/firebase-config.js

export default {
  apiKey: 'AIzaSyBRExKF0cHylh_wFLcd8Vxugj0UQRpq8oc',
  authDomain: 'reddit-clone-53da5.firebaseapp.com',
  databaseURL: 'https://reddit-clone-53da5.firebaseio.com',
  projectId: 'reddit-clone-53da5',
  storageBucket: 'reddit-clone-53da5.appspot.com',
  messagingSenderId: '490290211297',
};
We’ll import our Firebase config into App/index.js.
// App/index.js

import config from './firebase-config';
We will initialize our Firebase database connection in the constructor.
// App/index.js

constructor() {
  super();

  // Initialize Firebase
  firebase.initializeApp(config);
}
In the componentWillMount() lifecycle hook, we use the package firebase we just installed and call its initializeApp method and passed the config variable to it. This object contains all the data about our app. The initializeApp method will connect our application to our Firebase database so that we can read and write data.
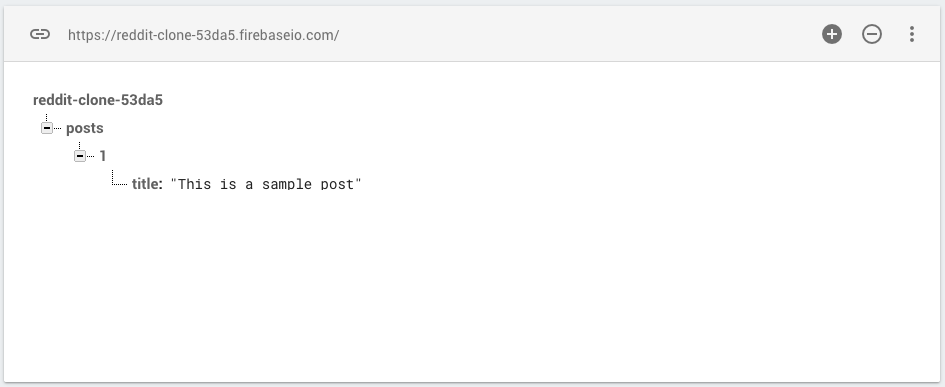
Let’s add some data to Firebase to check if our configuration is correct. Go to the Database tab and add the following structure to your database:
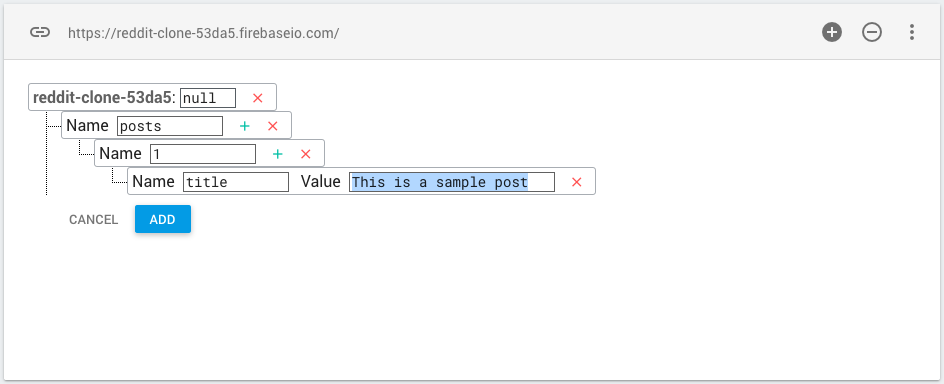
Clicking on Add will save the data to our database.
Now, let’s add some code to our componentWillMount method to make the data appear on our screen.
// App/index.js

componentWillMount() {
    ...

    let postsRef = firebase.database().ref('posts');

    let _this = this;

    postsRef.on('value', function(snapshot) {
      console.log(snapshot.val());

      _this.setState({
        posts: snapshot.val(),
        loading: false
      });
    });
  }
firebase.database() gives us a reference to the database service. Using ref(), we can get a specific reference from the database. For example, if we call ref('posts'), we will be getting the posts reference from our database and storing that reference in postsRef.
postsRef.on('value', ...) gives us the updated value whenever there is any change in the database. This is very useful when we need a real-time update to our user interface based on any database events.
Using postsRef.once('value', ...) will only give us the data once. This is useful for data that only needs to be loaded once and isn’t expected to change frequently or require active listening.
After we get the updated value in our on() callback, we store the values in our posts state.
Now, we will see the data appearing on our console.
Also, we will be passing this data down to our children. So, we need to modify the render function of our App/index.js file:
// App/index.js

render() {
  return (
    <div className="App">
      {this.props.children && React.cloneElement(this.props.children, {
        firebaseRef: firebase.database().ref('posts'),
        posts: this.state.posts,
        loading: this.state.loading
      })}
    </div>
  );
}
This main objective here is to make the posts data available in all our children components which will be passed through react-router.
We are checking if this.props.children exists or not and if it exists we clone that element and pass all our props to all our children. This is a very efficient way of passing props to dynamic children.
Calling cloneElement will shallowly merge the already existing props in this.props.children and the props, we passed here (firebaseRef, posts and loading).
Using this technique, the firebaseRef, posts and loading props will be available to all routes.
You can check my commit on Github.
Connecting The App With Firebase
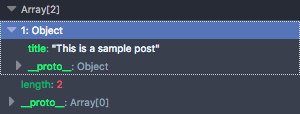
Firebase can only store data as objects; it doesn’t have any native support for arrays. We will store the data in the following format:
Add the data in the screenshot above manually so that you can test your views.
Add views for all the posts
Now, we will add views to show all the posts. Create a file src/containers/Posts/index.js with the following content:
// src/containers/Posts/index.js

import React, { Component } from 'react';

class Posts extends Component {
  render() {
    if (this.props.loading) {
      return <div>Loading...</div>;
    }

    return (
      <div className="Posts">
        {this.props.posts.map((post) => {
          return <div>{post.title}</div>;
        })}
      </div>
    );
  }
}

export default Posts;
Here, we are just mapping over the data and rendering it to the user interface.
Next, we need to add this to our routes.js file.
// routes.js

...
<Router {...props}>
  <Route path="/" component={ App }>
    <Route path="/posts" component={ Posts } />
  </Route>
</Router>
...
This is because we want the posts to show up only on the /posts route. So, we just pass the Posts component to the component prop and /posts to the path prop of the Route component of react-router.
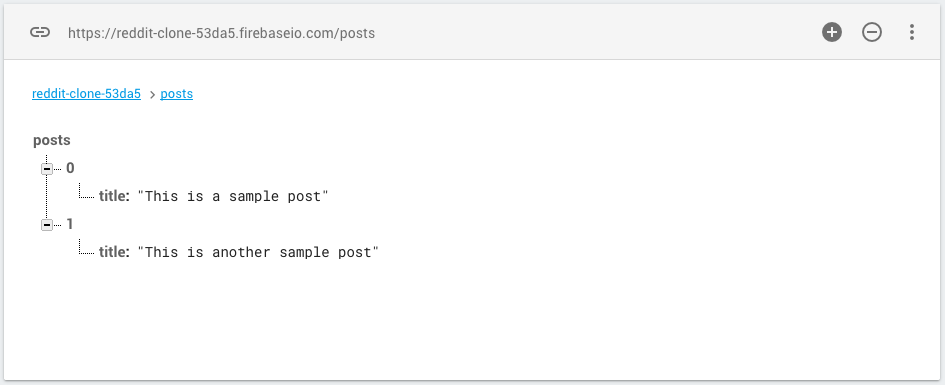
If we go to the URL localhost:3000/posts, we will see the posts from our Firebase database.
You can check my commit on Github.
Add views to write a new post
Now, let’s create a view from where we can add a new post. Create a file src/containers/AddPost/index.js with the following content:
// src/containers/AddPost/index.js

import React, { Component } from 'react';

class AddPost extends Component {
  constructor() {
    super();

    this.handleChange = this.handleChange.bind(this);
    this.handleSubmit = this.handleSubmit.bind(this);
  }

  state = {
    title: '',
  };

  handleChange = (e) => {
    this.setState({
      title: e.target.value,
    });
  };

  handleSubmit = (e) => {
    e.preventDefault();

    this.props.firebaseRef.push({
      title: this.state.title,
    });

    this.setState({
      title: '',
    });
  };

  render() {
    return (
      <div className="AddPost">
        <input
          type="text"
          placeholder="Write the title of your post"
          onChange={this.handleChange}
          value={this.state.title}
        />
        <button type="submit" onClick={this.handleSubmit}>
          Submit
        </button>
      </div>
    );
  }
}

export default AddPost;
Here, the handleChange method updates our state with the value present in the input box. Now, when we click on the button, the handleSubmit method is triggered. The handleSubmit method is responsible for making the API request to write to our database. We do it using the firebaseRef prop which we passed to all the children.
this.props.firebaseRef.push({
  title: this.state.title,
});
The above block of code sets the current value of the title to our database.
After the new post has been stored in the database, we make the input box empty again ready to add a new post.
Now, we need to add this page to our routes.
// routes.js

import React from 'react';
import { Router, Route } from 'react-router';

import App from './containers/App';
import Posts from './containers/Posts';
import AddPost from './containers/AddPost';

const Routes = (props) => (
  <Router {...props}>
    <Route path="/" component={App}>
      <Route path="/posts" component={Posts} />
      <Route path="/add-post" component={AddPost} />
    </Route>
  </Router>
);

export default Routes;
Here, we just added the /add-post route so that we can add a new post from that route. Hence, we passed the AddPost component to its component prop.
Also, let’s modify the render method of our src/containers/Posts/index.js file so that it can iterate over objects instead of arrays (since Firebase doesn’t store arrays).
// src/containers/Posts/index.js

render() {
    let posts = this.props.posts;

    if (this.props.loading) {
      return (
        <div>
          Loading...
        </div>
      );
    }

    return (
      <div className="Posts">
        { Object.keys(posts).map(function(key) {
            return (
              <div key={key}>
                { posts[key].title }
              </div>
            );
        })}
      </div>
    );
  }
Now, if we go to localhost:3000/add-post, we can add a new post. After clicking on the submit button, the new post will appear immediately on the posts page.
You can check my commit on Github.
Implement voting
Now, we need to allow users to vote on a post. For that, let’s modify the render method of our src/containers/App/index.js.
// src/containers/App/index.js

render() {
  return (
    <div className="App">
      {this.props.children && React.cloneElement(this.props.children, {
        // https://github.com/ReactTraining/react-router/blob/v3/examples/passing-props-to-children/app.js#L56-L58
        firebase: firebase.database(),
        posts: this.state.posts,
        loading: this.state.loading
      })}
    </div>
  );
}
We changed the firebase prop from firebaseRef: firebase.database().ref('posts') to firebase: firebase.database() because we will be using Firebase’s set method to update our voting count. In this way, if we had more Firebase refs, it would be very easy for us to handle them by using only the firebase prop.
Before proceeding with the voting, let’s modify the handleSubmit method in our src/containers/AddPost/index.js file a little bit:
// src/containers/AddPost/index.js

handleSubmit = (e) => {
  ...
  this.props.firebase.ref('posts').push({
    title: this.state.title,
    upvote: 0,
    downvote: 0
  });
  ...
}
We renamed our firebaseRef prop to firebase prop. So, we change the this.props.firebaseRef.push to this.props.firebase.ref('posts').push.
Now, we need to modify our src/containers/Posts/index.js file to accomodate the voting.
The render method should be modified to:
// src/containers/Posts/index.js

render() {
  let posts = this.props.posts;
  let _this = this;

  if (!posts) {
    return false;
  }

  if (this.props.loading) {
    return (
      <div>
        Loading...
      </div>
    );
  }

  return (
    <div className="Posts">
      { Object.keys(posts).map(function(key) {
          return (
            <div key={key}>
              <div>Title: { posts[key].title }</div>
              <div>Upvotes: { posts[key].upvote }</div>
              <div>Downvotes: { posts[key].downvote }</div>
              <div>
                <button
                  onClick={ _this.handleUpvote.bind(this, posts[key], key) }
                  type="button"
                >
                  Upvote
                </button>
                <button
                  onClick={ _this.handleDownvote.bind(this, posts[key], key) }
                  type="button"
                >
                  Downvote
                </button>
              </div>
            </div>
          );
      })}
    </div>
  );
}
When the buttons are clicked, the upvote or downvote count will be incremented in our Firebase DB. To handle that logic, we create two more methods: handleUpvote() and handleDownvote():
// src/containers/Posts/index.js

handleUpvote = (post, key) => {
  this.props.firebase.ref('posts/' + key).set({
    title: post.title,
    upvote: post.upvote + 1,
    downvote: post.downvote,
  });
};

handleDownvote = (post, key) => {
  this.props.firebase.ref('posts/' + key).set({
    title: post.title,
    upvote: post.upvote,
    downvote: post.downvote + 1,
  });
};
In these two methods, whenever a user clicks on either of the buttons, the respective count is incremented in the database and is instantly updated in the browser.
If we open two tabs with localhost:3000/posts and click on the voting buttons of the posts, we will see each of the tabs get updated almost instantly. This is the magic of using a real-time database like Firebase.
You can check my commit on Github.
In the repository, I’ve added the /posts route to the IndexRoute of the application just to show the posts on localhost:3000 by default. You can check that commit on Github.
Conclusion
The end result is admittedly a bit barebones, as we didn’t try to implement any design (although the demo has some basic styles added). We also didn’t add any authentication in order to reduce the complexity and the length of the tutorial, but obviously any real-world application would require it.
Firebase is really useful for places where you don’t want to create and maintain a separate backend application or where you want real-time data without investing too much time developing your APIs. It plays really well with React, as you can hopefully see from the article.