To celebrate the official release of React 16.3, I have decided to share some techniques I have been using recently which have completely changed my approach to creating React components. Using these techniques I am able to design components that are completely reusable, and have the flexibility to use these components in a number of different contexts.
codesandbox: 5x22900pnl
The sandbox above represents the initial code of a neat and tidy stepper component I will use to showcase some of these techniques. As it stands, this component is working completely fine, and does exactly what it was designed to do, however, there is no flexibility.
import React, { Component } from 'react';
import Stepper from './Stepper';

class App extends Component {
  render() {
    return <Stepper stage={1} />;
  }
}

export default App;
As you can see, the ‘Stepper’ component’s flexibility ends at the stage prop; we are only able to change the stage to where it starts.
What if I need to position the progress block on the right hand side?
What if I need a similar Stepper with extra stages?
What if I need to change the content of the stages?
What if I wanted to change the order of the stages?
As it stands, the only way I could I achieve these changes is by completely re-writing the component. Re-writing it in the same fashion would yield a similar outcome. However, if more changes are needed again in the future, the component would need to be re-written again. So, let’s try a different approach and rewire the component so it has flexibility and reusability to be used in any future configurations.
In the first part of this series we will discuss a design pattern called “Compound Components”
Using the Compound Component design pattern
To start, let’s take a look at the ‘Stepper’ component.
class Stepper extends Component {
  state = {
    stage: this.props.stage,
  };
  static defaultProps = {
    stage: 1,
  };
  handleClick = () => {
    this.setState({ stage: this.state.stage + 1 });
  };
  render() {
    const { stage } = this.state;
    return (
      <div style={styles.container}>
        <Progress stage={stage} />
        <Steps handleClick={this.handleClick} stage={stage} />
      </div>
    );
  }
}

export default Stepper;
The ‘Stepper’ component is basically a component that contains a state object which stores the current stage, a method that increases value of the stage property, and a render method that returns a div with 2 child components.
Currently, we are explicitly placing the ‘Progress’ and ‘Steps’ components directly inside the ‘Stepper’ component. To alleviate this static approach we can use the props object to dynamically inject the child components.
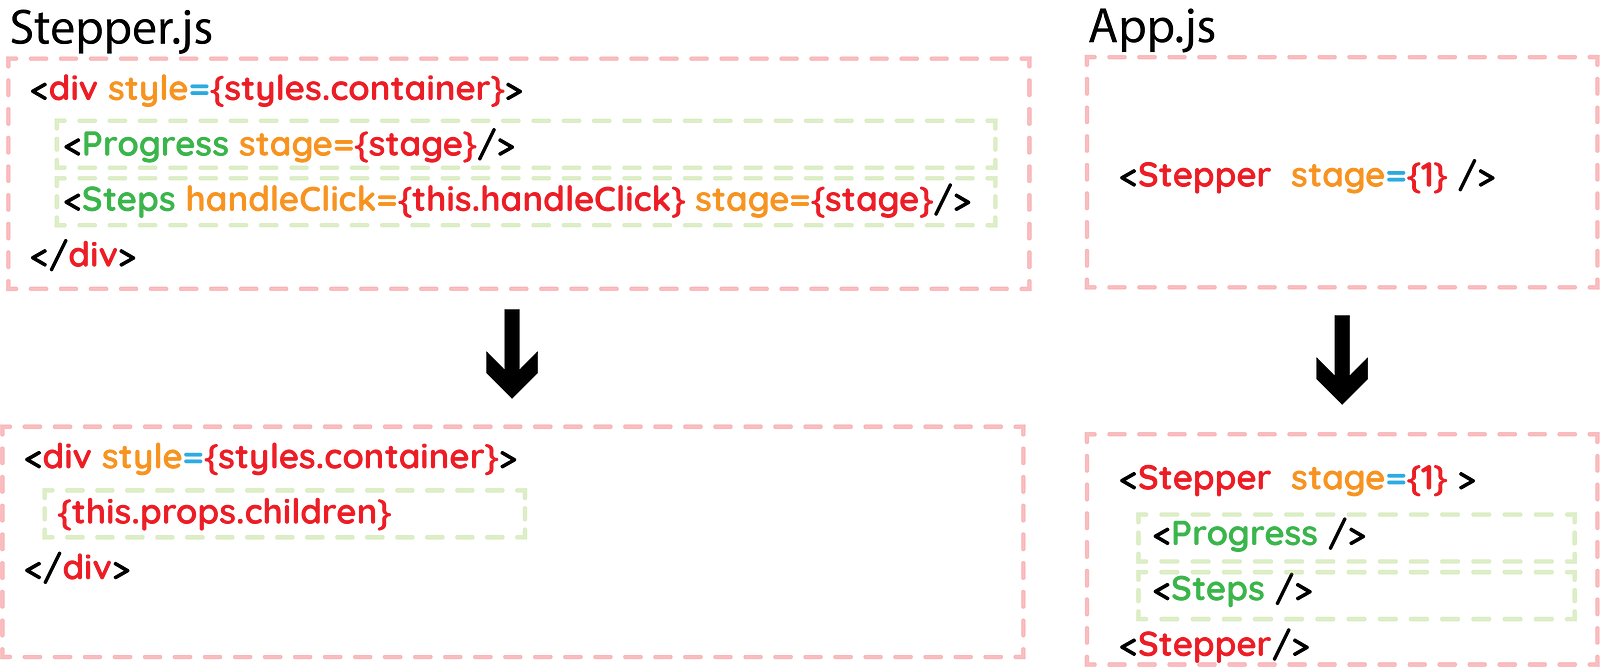
Using this alternative approach, we can instead use the props.children object inside the Stepper.js file and place the ‘Progress’ and ‘Steps’ components inside the ‘Stepper’ component.
Just this simple change gives us instant benefits. We can now choose which component in the tree is rendered first; we can choose if the progress block is on the left or the right hand side.
There is one major problem with this approach, however. The ‘Progress’ and ‘Steps’ components no longer have access to the ‘stage’ and ‘handleClick’ props. In order for each child component to receive the props they need, we need to manually loop through the each child and inject the props inside them. We can do that using a number of helper methods provided by the react API. Two options include:- Children.map() and cloneElement().
const children = React.Children.map(this.props.children, (child) => {
  return React.cloneElement(child, { stage, handleClick: this.handleClick });
});
The Children.map() is similar to the Array.map() method. It is needed because the children.props has an opaque data structure making the Array.map() method unsuitable for this use case.
The cloneElement does as the name suggests and clones the child component passed into it. Crucially, it also comes with the added ability of injecting extra props. Boom!
// Render method of Stepper.js
const { stage } = this.state;
const children = React.Children.map(this.props.children, (child) => {
  return React.cloneElement(child, { stage, handleClick: this.handleClick });
});
return <div style={styles.container}>{children}</div>;
Now we can add the ‘Progress’ and ‘Stage’ as children to the ‘Stepper’ component and everything works the same as before. This time we can decide the position of each component, or if we want to be really crazy, we could have a progress block on both sides.
import React, { Component } from 'react';
import Stepper from './Stepper';
import Progress from './components/Progress';
import Steps from './components/Steps';

class App extends Component {
  render() {
    return (
      <div>
        <Stepper stage={1}>
          <Progress />
          <Steps />
        </Stepper>
      </div>
    );
  }
}
export default App;
Static Properties
Another cool technique to improve readability and ease of use is using static properties of classes. This allows us to call methods directly on the class.
What on earth does this mean? Lets take a look….
First, we need to create static methods inside the Stepper component and assign them to the ‘Progress’ and ‘Steps’ components:
static Progress = Progress
static Steps = Steps
So now, instead of us importing the Progress and Steps components in numerous places we can instead call them directly from the Stepper component:
import React, { Component } from 'react';
import Stepper from './Stepper';

class App extends Component {
  render() {
    return (
      <Stepper stage={1}>
        <Stepper.Progress />
        <Stepper.Steps />
      </Stepper>
    );
  }
}
export default App;
We have started to generate a simple, readable API that is somewhat flexible. Why not use some of the same techniques for the ‘Progress’ component? Lets take a look at it…
export default class Progress extends Component {
  render() {
    const { stage } = this.props;
    return (
      <div style={styles.progressContainer}>
        <Stage stage={stage} num={1} />
        <Stage stage={stage} num={2} />
        <Stage stage={stage} num={3} />
        <Stage stage={stage} num={4} />
      </div>
    );
  }
}
You may notice that its rigidity is very similar to the Stepper component we looked at before. Let’s replace the 4 Stage components with the more dynamic children.props object, loop through the children adding the required props and then add a static method so it can called directly from the Stepper class.
export default class Progress extends Component {
  render() {
    const { stage } = this.props;
    const children = React.Children.map(this.props.children, (child) => {
      return React.cloneElement(child, { stage });
    });
    return <div style={styles.progressContainer}>{children}</div>;
  }
}
Once that is done we can dynamically add as many Stage components as we want in whatever position we want:
import React, { Component } from 'react';
import Stepper from './Stepper';

class App extends Component {
  render() {
    return (
      <Stepper stage={1}>
        <Stepper.Progress>
          <Stepper.Stage num={1} />
          <Stepper.Stage num={2} />
          <Stepper.Stage num={3} />
          <Stepper.Stage num={4} />
        </Stepper.Progress>
        <Stepper.Steps />
      </Stepper>
    );
  }
}
export default App;
We can do the same thing with the Steps component although this one is a little trickier as each child needs to be wrapped in a React’s Transition Group Transition component. The same loop technique will need to be applied, but the component will only be visible if the stage prop matches the component’s num prop. If there is a match, its wrapped in a Transition component (the ReactTransitionGroup docs explain the purpose of this) and is rendered on screen.
class Steps extends Component {
  render() {
    const { stage, handleClick } = this.props;
    const children = React.Children.map(this.props.children, (child) => {
      console.log(child.props);
      return (
        stage === child.props.num && (
          <Transition
            appear={true}
            timeout={300}
            onEntering={entering}
            onExiting={exiting}
          >
            {child}
          </Transition>
        )
      );
    });
    return (
      <div style={styles.stagesContainer}>
        <div style={styles.stages}>
          <TransitionGroup>{children}</TransitionGroup>
        </div>
        <div style={styles.stageButton}>
          <Button disabled={stage= 4} click={handleClick}>
            Continue
          </Button>
        </div>
      </div>
    );
  }
}

export default Steps;
By adding the relevant static methods on the Stepper.js component we can add as many Step components as we want, in what ever order we want.
import React, { Component } from 'react';
import Stepper from './Stepper';

class App extends Component {
  render() {
    return (
      <Stepper stage={1}>
        <Stepper.Progress>
          <Stepper.Stage num={1} />
          <Stepper.Stage num={2} />
          <Stepper.Stage num={3} />
        </Stepper.Progress>
        <Stepper.Steps>
          <Stepper.Step num={1} text={'Stage 1'} />
          <Stepper.Step num={2} text={'Stage 2'} />
          <Stepper.Step num={3} text={'Stage 3'} />
          <Stepper.Step num={4} text={'Stage 4'} />
        </Stepper.Steps>
      </Stepper>
    );
  }
}
export default App;
We have created a way more flexible and reusable component. We can now choose how many stages, what text will go in each stage, the order of each stage, and whether we would like the progress bar on the left or the right.
codesandbox: 5x22900pnl
We are still constrained in terms of flexibility though! What if we wanted to add a title block just above the Steps block?
class App extends Component {
  render() {
    return (
      <Stepper stage={1}>
        <Stepper.Progress>
          <Stepper.Stage num={1} />
          <Stepper.Stage num={2} />
          <Stepper.Stage num={3} />
        </Stepper.Progress>
        <div>
          <div>Title</div>
          <Stepper.Steps>
            <Stepper.Step num={1} text={'Stage 1'} />
            <Stepper.Step num={2} text={'Stage 2'} />
            <Stepper.Step num={3} text={'Stage 3'} />
            <Stepper.Step num={4} text={'Complete!'} />
          </Stepper.Steps>
        </div>
      </Stepper>
    );
  }
}
export default App;
This would break our application as the ‘Stepper.Steps’ component is no longer a direct child of the ‘Stepper’ component and does not have access to the stage prop.
This is why the release of React 16.3 is quite a big deal! Up until now, React’s context API was in an experimental phase but now it’s been made official!
In Part 2 of this series I will discuss how we can implement the context API to be able to pass down props anywhere in the tree, so regardless of where the ‘Stepper.Steps’ component is positioned it will always be able to access the stage prop.